向万鹏的独立博客


  • 首页

  • 分类

  • 归档

  • 标签

mybatis一级缓存和二级缓存

发表于 2016-12-21   |   分类于 mybatis   |  

mybatis一级缓存

  mybatis一级缓存是SqlSession级别的缓存。
  一级缓存的作用域是同一个SqlSession,在同一个sqlSession中两次执行相同的sql语句,第一次执行完毕会将数据库中查询的数据写到缓存(内存),第二次会从缓存中获取数据将不再从数据库查询,从而提高查询效率。当一个sqlSession结束后该sqlSession中的一级缓存也就不存在了。
  mybatis默认开启一级缓存。
  
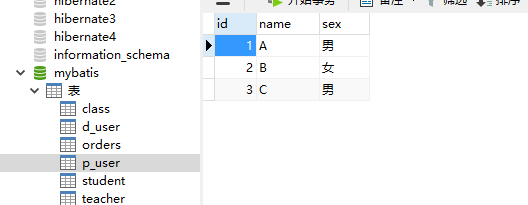
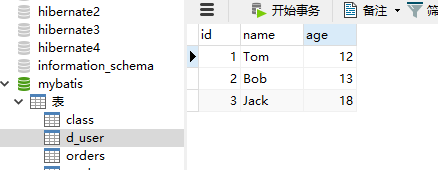
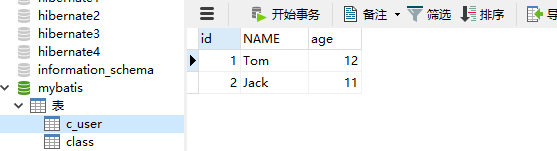
  下面测试一级缓存,首先创建数据库表c_user并插入两条数据:

1
2
3
4
5
6
7
CREATE TABLE c_user(
id INT PRIMARY KEY AUTO_INCREMENT,
NAME VARCHAR(20),
age INT
);
INSERT INTO c_user(NAME, age) VALUES('Tom', 12);
INSERT INTO c_user(NAME, age) VALUES('Jack', 11);

image_1b4gr4fo2gn518ihfd2eli1tbg9.png-13.9kB

创建实体类CUser:

1
2
3
4
5
6
7
8
9
10
11
12
13
14
15
16
17
18
19
20
21
22
23
public class CUser {
private int id;
private String name;
private int age;
  //getters and setters
  
@Override
public String toString() {
return "CUser [id=" + id + ", name=" + name + ", age=" + age + "]";
}
public CUser(int id, String name, int age) {
super();
this.id = id;
this.name = name;
this.age = age;
}
public CUser() {
super();
}
}

编写配置文件userMapper.xml:
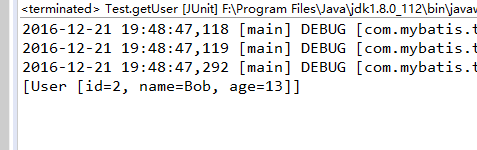
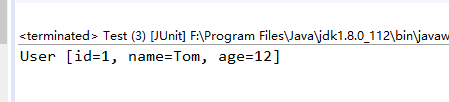
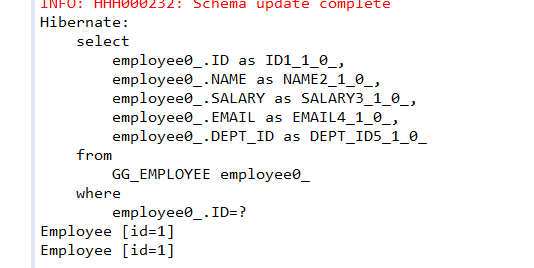
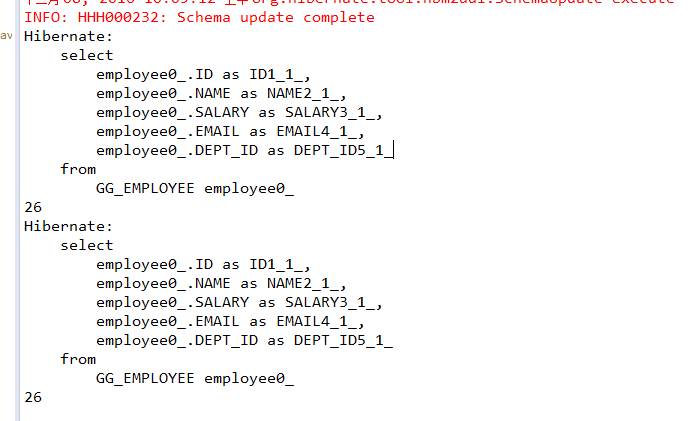
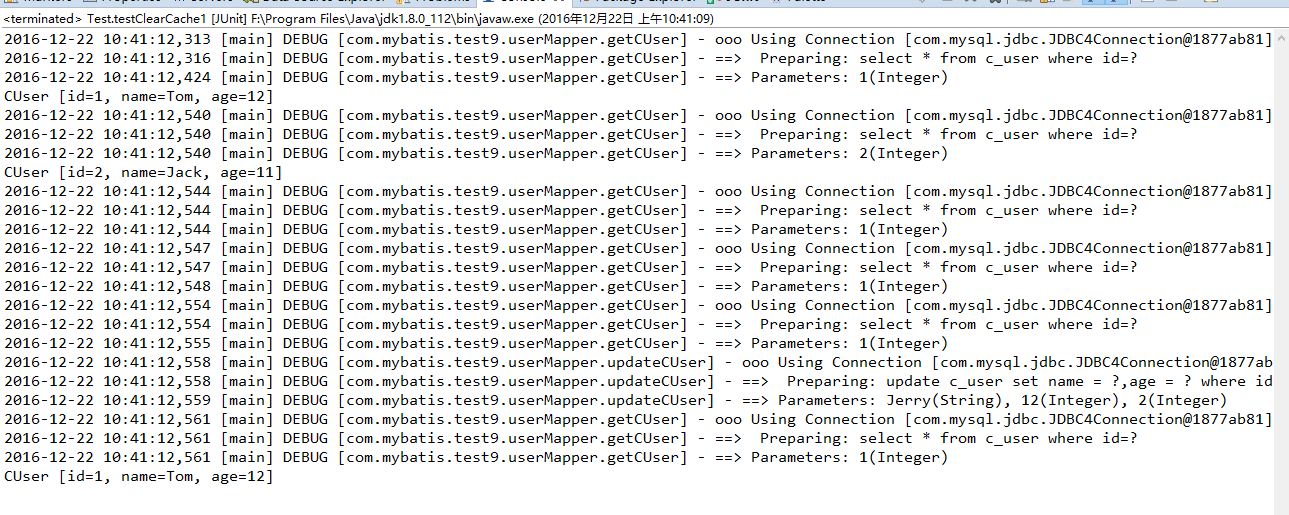
1
2
3
4
5
6
7
8
9
10
11
<?xml version="1.0" encoding="UTF-8" ?>
<!DOCTYPE mapper PUBLIC "-//mybatis.org//DTD Mapper 3.0//EN" "http://mybatis.org/dtd/mybatis-3-mapper.dtd">
<mapper namespace="com.mybatis.test9.userMapper">
<select id="getCUser" parameterType="int" resultType="CUser">
select * from c_user where id=#{id}
</select>
<update id="updateCUser" parameterType="CUser">
update c_user set name = #{name},age = #{age} where id = #{id}
</update>
</mapper>

首先测试一级缓存的作用:

1
2
3
4
5
6
7
8
9
10
11
12
13
14
15
@org.junit.Test
public void testCache1() {
String resource = "conf.xml";
InputStream is = this.getClass().getClassLoader().getResourceAsStream(resource);
SqlSessionFactory sessionFactory = new SqlSessionFactoryBuilder().build(is);
SqlSession session = sessionFactory.openSession();
String statement = "com.mybatis.test9.userMapper"+".getCUser";
CUser user1 = session.selectOne(statement, 1);
System.out.println(user1);
CUser user2 = session.selectOne(statement, 1);
System.out.println(user2);
}

运行结果:

image_1b4i6di3n5501kg4mr41llu169l13.png-39.8kB

  从运行结果中发现,虽然执行了两次selectOne函数,但是只执行了一条SELECT语句。这是由于两次查找的条件相同,即都是查询id为1的记录,所以缓存起了作用,第二次执行selectOne方法并没有重新去数据库查询记录。
  那么,哪些情况下会重新去数据库执行查询操作呢?有下面几种情况:

1
2
3
4
5
6
7
8
9
10
11
12
13
14
15
16
17
18
19
20
21
22
23
24
25
26
27
28
29
30
31
32
33
34
35
36
37
@org.junit.Test
public void testClearCache1() {
String resource = "conf.xml";
InputStream is = this.getClass().getClassLoader().getResourceAsStream(resource);
SqlSessionFactory sessionFactory = new SqlSessionFactoryBuilder().build(is);
SqlSession session = sessionFactory.openSession();
String statement1 = "com.mybatis.test9.userMapper"+".getCUser";
String statement2 = "com.mybatis.test9.userMapper"+".updateCUser";
CUser user1 = session.selectOne(statement1, 1);
System.out.println(user1);
//1. 如果查询条件改变,会重新查询
CUser user2 = session.selectOne(statement1, 2);
System.out.println(user2);
//2. 如果SqlSession执行了commit,clearCache或者close,会重新查询
//提交后会清空缓存
session.commit();
user2 = session.selectOne(statement1, 1);
//执行clearCache清空缓存
session.clearCache();
user2 = session.selectOne(statement1, 1);
//关闭session后再开启,也会清空缓存
session.close();
session = sessionFactory.openSession();
user2 = session.selectOne(statement1, 1);
//3. 执行增删改操作,即使还没有commit,也会清空缓存
CUser newCUser = new CUser(2,"Jerry",12);
session.update(statement2,newCUser);
user2 = session.selectOne(statement1, 1);
System.out.println(user2);
}

运行结果:

image_1b4i6f5ficbv48boiolk0hge1g.png-120.7kB

mybatis二级缓存

  mybatis二级缓存是mapper级别的缓存,多个SqlSession去操作同一个Mapper的sql语句,多个SqlSession去操作数据库得到数据会存在二级缓存区域,多个SqlSession可以共用二级缓存,二级缓存是跨SqlSession的。
  二级缓存是多个SqlSession共享的,其作用域是mapper的同一个namespace,不同的sqlSession两次执行相同namespace下的sql操作且向sql中传递参数也相同,即最终执行相同的sql语句,第一次执行完毕会将数据库中查询的数据写到缓存(内存),第二次会从缓存中获取数据将不再从数据库查询,从而提高查询效率。
  在mybatis的配置文件中,二级缓存的总开关默认已经开启,但是对应的映射文件中没有配置开启二级缓存,所以需要在具体的mapper.xml中开启二级缓存。
  下面测试mybatis二级缓存,首先需要在对应的映射文件中开启二级缓存:

1
2
3
4
5
6
7
8
9
10
11
12
13
14
15
16
17
<?xml version="1.0" encoding="UTF-8" ?>
<!DOCTYPE mapper PUBLIC "-//mybatis.org//DTD Mapper 3.0//EN" "http://mybatis.org/dtd/mybatis-3-mapper.dtd">
<mapper namespace="com.mybatis.test10.userMapper">
<!-- 开启二级缓存 -->
<cache></cache>
<select id="getCUser" parameterType="int" resultType="CUser">
select *
from c_user where id=#{id}
</select>
<update id="updateCUser" parameterType="CUser">
update c_user set name =
#{name},age = #{age} where id = #{id}
</update>
</mapper>

而且需要是被缓存的实体类实现Serializable接口:
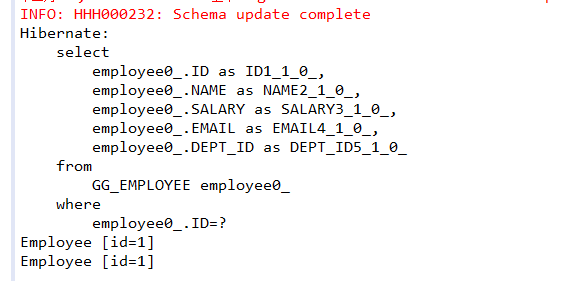
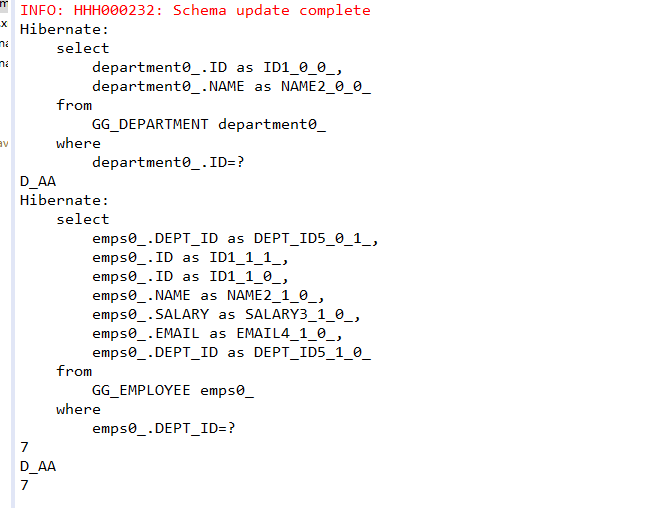
1
2
3
public class CUser implements Serializable{
...
}

编写测试类测试二级缓存:

1
2
3
4
5
6
7
8
9
10
11
12
13
14
15
16
17
18
19
20
21
22
23
24
25
26
public class Test {
@org.junit.Test
public void testCache2() {
String resource = "conf.xml";
InputStream is = this.getClass().getClassLoader().getResourceAsStream(resource);
SqlSessionFactory sessionFactory = new SqlSessionFactoryBuilder().build(is);
//获取两个不同的SqlSession
SqlSession session1 = sessionFactory.openSession();
SqlSession session2 = sessionFactory.openSession();
String statement1 = "com.mybatis.test10.userMapper"+".getCUser";
CUser user1 = session1.selectOne(statement1, 1);
//前一个session执行commit后,二级缓存才会生效
session1.commit();
CUser user2 = session2.selectOne(statement1, 1);
System.out.println(user1);
System.out.println(user2);
}
}

运行结果:

image_1b4i7d5tj1ijc1me26rppilfgl1t.png-42.9kB

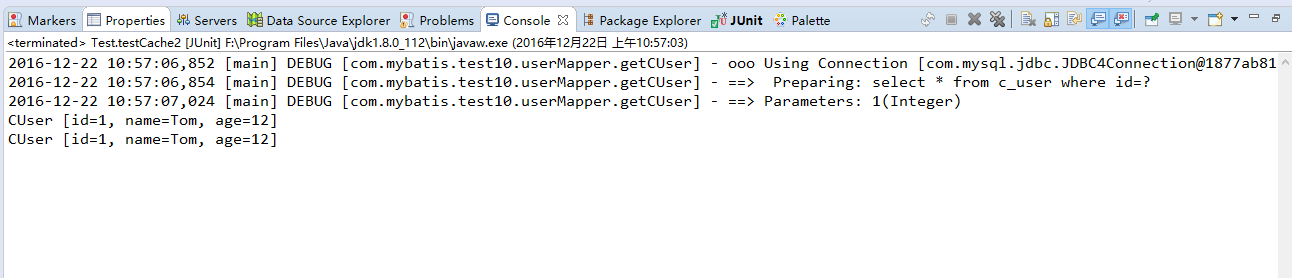
可以看到,虽然是通过两个不同的SqlSession查询记录,但是只执行了一次SELECT语句,这正是mybatis二级缓存的作用。

注意点:

  1. 需要在对应的映射文件中配置开启二级缓存。
  2. 被缓存的实体类需要实现Serializable接口。
  3. SqlSession必须执行commit或者close方法后,其中的数据才会被写入到二级缓存。
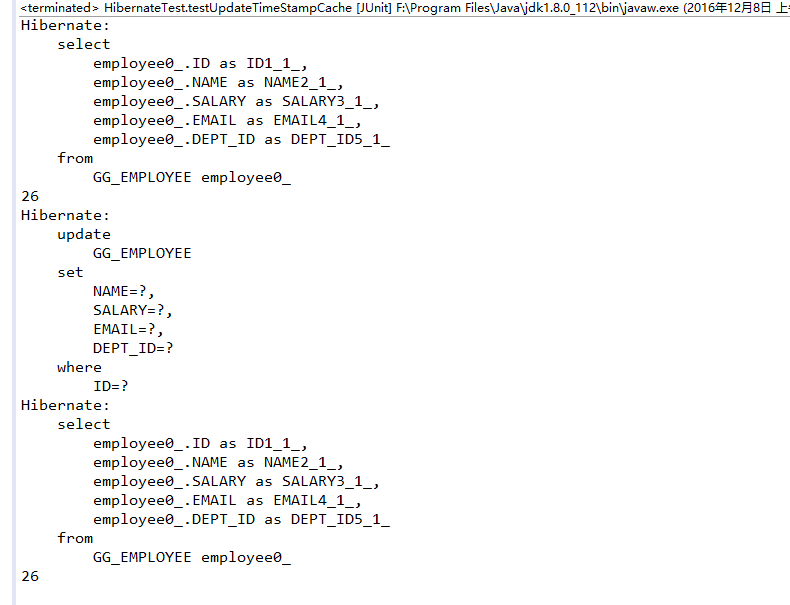
  4. 当执行了增删改操作后,会刷新二级缓存:
    1
    2
    3
    4
    5
    6
    7
    8
    9
    10
    11
    12
    13
    14
    15
    16
    17
    18
    19
    20
    21
    22
    23
    24
    25
    26
    27
    @org.junit.Test
    public void testClearCache2() {
    String resource = "conf.xml";
    InputStream is = this.getClass().getClassLoader().getResourceAsStream(resource);
    SqlSessionFactory sessionFactory = new SqlSessionFactoryBuilder().build(is);
    //获取两个不同的SqlSession
    SqlSession session1 = sessionFactory.openSession();
    SqlSession session2 = sessionFactory.openSession();
    String statement1 = "com.mybatis.test10.userMapper"+".getCUser";
    String statement2 = "com.mybatis.test10.userMapper"+".updateCUser";
    CUser user1 = session1.selectOne(statement1, 1);
    //当执行了增删改操作后,会刷新二级缓存
    CUser newUser = new CUser(2, "Bob", 14);
    session1.update(statement2,newUser);
    session1.commit();
    CUser user2 = session2.selectOne(statement1, 1);
    System.out.println(user1);
    System.out.println(user2);
    }

运行结果如下:
image_1b4i83is91t08135r1nbs103cee42a.png-76.4kB

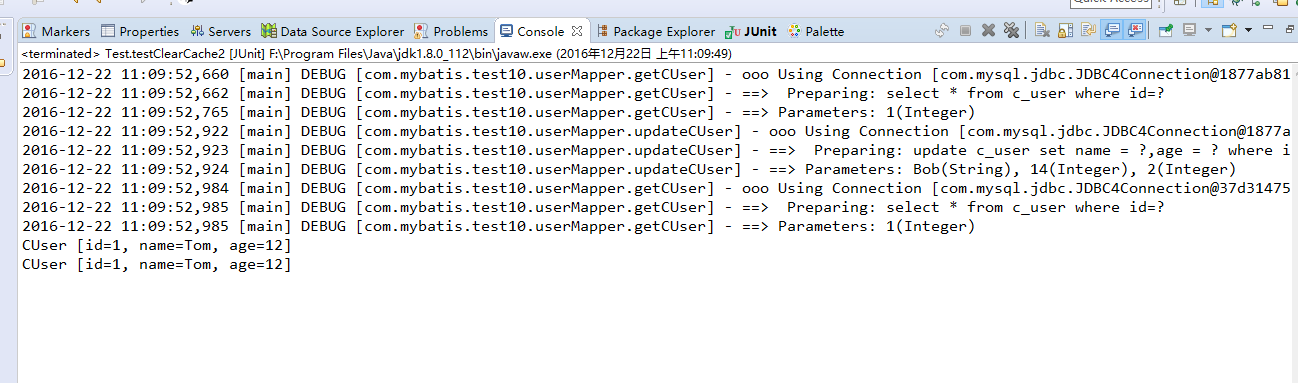
  在映射文件中配置开启二级缓存时,cache节点还可以配置如下属性:

1
2
3
4
5
6
<!-- 开启二级缓存 -->
<!-- eviction="FIFO"指定回收策略为先进先出 -->
<!-- flushInterval="60000"指定自动刷新时间为60s -->
<!-- size="512"指定最多缓存512个引用对象 -->
<!-- readOnly="true"表示返回的对象是只读的 -->
<cache eviction="FIFO" flushInterval="60000" size="512" readOnly="true"></cache>

mybatis调用存储过程

发表于 2016-12-21   |   分类于 mybatis   |  

  现在通过调用数据库的存储过程,实现这样一种功能:有一张表p_user,当传入参数为0时,返回表中女性记录的数量,否则,返回表中男性记录的数量。
 
创建数据表并插入数据:

1
2
3
4
5
6
7
8
9
create table p_user(
id int primary key auto_increment,
name varchar(10),
sex char(2)
);
insert into p_user(name,sex) values('A',"男");
insert into p_user(name,sex) values('B',"女");
insert into p_user(name,sex) values('C',"男");

image_1b4glot05ei18ik1i0u10631n6n9.png-14.5kB

创建存储过程,查询得到男性或女性的数量,如果传入的是0就女性否则是男性:

1
2
3
4
5
6
7
8
9
10
DELIMITER $
CREATE PROCEDURE mybatis.get_user_count(IN sex_id INT, OUT user_count INT)
BEGIN
IF sex_id=0 THEN
SELECT COUNT(*) FROM mybatis.p_user WHERE p_user.sex='女' INTO user_count;
ELSE
SELECT COUNT(*) FROM mybatis.p_user WHERE p_user.sex='男' INTO user_count;
END IF;
END
$

创建实体类User:

1
2
3
4
5
6
7
8
9
10
11
12
13
14
15
16
17
18
19
20
21
22
23
public class PUser {
private String id;
private String name;
private String sex;
//getters and setters
@Override
public String toString() {
return "PUser [id=" + id + ", name=" + name + ", sex=" + sex + "]";
}
public PUser(String id, String name, String sex) {
super();
this.id = id;
this.name = name;
this.sex = sex;
}
public PUser() {
super();
}
}

创建映射文件userMapper.xml:

1
2
3
4
5
6
7
8
9
10
11
12
<?xml version="1.0" encoding="UTF-8" ?>
<!DOCTYPE mapper PUBLIC "-//mybatis.org//DTD Mapper 3.0//EN" "http://mybatis.org/dtd/mybatis-3-mapper.dtd">
<mapper namespace="com.mybatis.test8.userMapper">
<select id="getCount" statementType="CALLABLE" parameterMap="getCountMap">
call mybatis.get_user_count(?,?)
</select>
<parameterMap type="java.util.Map" id="getCountMap">
<parameter property="sex_id" mode="IN" jdbcType="INTEGER"/>
<parameter property="user_count" mode="OUT" jdbcType="INTEGER"/>
</parameterMap>
</mapper>

编写测试类:

1
2
3
4
5
6
7
8
9
10
11
12
13
14
15
16
17
18
19
20
21
22
23
24
25
26
27
28
29
30
31
32
33
public class Test {
private SqlSessionFactory sessionFactory;
private SqlSession session;
@Before
public void init(){
//读取配置文件
String resource = "conf.xml";
InputStream is = this.getClass().getClassLoader().getResourceAsStream(resource);
//创建SqlSessionFactory和SqlSession
sessionFactory = new SqlSessionFactoryBuilder().build(is);
session = sessionFactory.openSession();
}
@After
public void free(){
session.commit();
session.close();
}
@org.junit.Test
public void getCount() {
String statement = "com.mybatis.test8.userMapper"+".getCount";
Map<String,Integer> map = new HashMap<>();
map.put("sex_id", 1);
session.selectOne(statement, map);
int userCount = map.get("user_count");
System.out.println(userCount);
}
}

运行结果:

image_1b4gnq23tgll1aqei2b1u9oi19.png-23kB

注意点:

  1. 在映射文件中,需要配置select节点的statementType属性为CALLABLE,且要使用parameterMap属性映射一个存放参数的parameterMap。
  2. 需要定义parameterMap,其id与select节点的parameterMap属性一致,type指定parameterMap真实类型为java.util.Map,其中的parameter节点以键值对的形式存放参数,property属性需要和定义在存储过程中的参数名一致。

mybatis的动态SQL与模糊查询

发表于 2016-12-20   |   分类于 mybatis   |  

  现在以一个例子来介绍mybatis的动态SQL和模糊查询:通过多条件查询用户记录,条件为姓名模糊匹配,并且年龄在某两个值之间。
  
新建表d_user:

1
2
3
4
5
6
7
8
9
create table d_user(
id int primary key auto_increment,
name varchar(10),
age int(3)
);
insert into d_user(name,age) values('Tom',12);
insert into d_user(name,age) values('Bob',13);
insert into d_user(name,age) values('Jack',18);

建表成功:

image_1b4gjg2c1f1l1gob9to15lpp3bm.png-12.8kB

新建实体类User:

1
2
3
4
5
6
7
8
9
10
11
12
13
14
15
16
17
18
19
20
21
22
23
public class User {
private Integer id;
private String name;
private Integer age;
  //getters and setters
  
@Override
public String toString() {
return "User [id=" + id + ", name=" + name + ", age=" + age + "]";
}
public User(Integer id, String name, Integer age) {
super();
this.id = id;
this.name = name;
this.age = age;
}
public User() {
super();
}
}

创建查询条件实体类ConditionUser:

1
2
3
4
5
6
7
8
9
10
11
12
13
14
15
16
17
18
public class ConditionUser {
private String name;
private int minAge;
private int maxAge;
  //getters and setters
  
public ConditionUser(String name, int minAge, int maxAge) {
super();
this.name = name;
this.minAge = minAge;
this.maxAge = maxAge;
}
public ConditionUser() {
super();
}
}

新建映射文件userMapper.xml:

1
2
3
4
5
6
7
8
9
<?xml version="1.0" encoding="UTF-8" ?>
<!DOCTYPE mapper PUBLIC "-//mybatis.org//DTD Mapper 3.0//EN" "http://mybatis.org/dtd/mybatis-3-mapper.dtd">
<mapper namespace="com.mybatis.test7.userMapper">
<select id="getUser" parameterType="ConditionUser" resultType="User">
SELECT * FROM d_user WHERE age &gt;= #{minAge} AND age &lt;= #{maxAge}
<if test="name!=null">
AND name LIKE CONCAT(CONCAT('%',#{name}),'%')</if>
</select>
</mapper>

编写测试类:

1
2
3
4
5
6
7
8
9
10
11
12
13
14
15
16
17
18
19
20
21
22
23
24
25
26
27
28
29
30
31
public class Test {
private SqlSessionFactory sessionFactory;
private SqlSession session;
@Before
public void init(){
//读取配置文件
String resource = "conf.xml";
InputStream is = this.getClass().getClassLoader().getResourceAsStream(resource);
//创建SqlSessionFactory和SqlSession
sessionFactory = new SqlSessionFactoryBuilder().build(is);
session = sessionFactory.openSession();
}
@After
public void free(){
session.commit();
session.close();
}
@org.junit.Test
public void getUser() {
String statement = "com.mybatis.test7.userMapper"+".getUser";
ConditionUser conditionUser = new ConditionUser("o", 13, 18);
List<User> list = session.selectList(statement, conditionUser);
System.out.println(list);
}
}

运行结果:

image_1b4gjeoo71aqa8hc1pg746l1vps9.png-12.9kB

注意:

  1. 在配置文件中编写sql语句时,为防止大于号和小于号在表示大小关系和表示标签符号之间产生混淆,所以通常用&gt;和&lt;来代替sql语句中大于号和小于号。
  2. 在SQL语句中添加动态SQL标签if的原因是,当在后台获取的name属性值为null时,防止生成where name like %null%的条件判断语句,正确的逻辑应该是,当传来的name属性值为null时,取消此筛选条件,即不使用where name like ?的判断条件。在mybatis中,可用的动态SQL标签有:if,choose(when,otherwise),trim(where,set),foreach。
  3. 在使用模糊查询时,拼接%+#{name}+%的方法有如下几种:

(1).像上述例子中一样,在SQL语句中使用CONCAT关键字。

(2).使用${}代替#{}:

1
2
3
4
5
6
7
8
9
<?xml version="1.0" encoding="UTF-8" ?>
<!DOCTYPE mapper PUBLIC "-//mybatis.org//DTD Mapper 3.0//EN" "http://mybatis.org/dtd/mybatis-3-mapper.dtd">
<mapper namespace="com.mybatis.test7.userMapper">
<select id="getUser" parameterType="ConditionUser" resultType="User">
SELECT * FROM d_user WHERE age &gt;= #{minAge} AND age &lt;= #{maxAge}
<if test="name!=null">
AND name LIKE '%${name}%'</if>
</select>
</mapper>

注意,默认情况下,使用#{}语法,MyBatis会产生PreparedStatement语句,并且安全地设置PreparedStatement参数,这个过程中MyBatis会进行必要的安全检查和转义。例如:

执行SQL:select from emp where name = #{employeeName}
参数:employeeName=>Smith
解析后执行的SQL:select
from emp where name = ?

执行SQL:Select from emp where name = ${employeeName}
参数:employeeName传入值为:Smith
解析后执行的SQL:Select
from emp where name =Smith

综上所述,\${}方式可能会引发SQL注入的问题,同时也会影响SQL语句的预编译,所以从安全性和性能的角度出发,应尽量使用#{}。当需要直接插入一个不做任何修改的字符串到SQL语句中,例如在ORDER BY后接一个不添加引号的值作为列名,这时候就需要使用${}。

(3).在程序中拼接。

mybatis一对多关联关系

发表于 2016-12-20   |   分类于 mybatis   |  

  在《mybatis一对一关联关系》中,我们以班级和教师的例子介绍了一对一的关联关系,现在引入学生类,一个学生对应一个班级,一个班级对应多个学生,来介绍mybatis如何处理一对多的关联关系。
  
  首先创建表和实体类:

teacher表:

1
2
3
4
5
6
CREATE TABLE teacher(
t_id INT PRIMARY KEY AUTO_INCREMENT,
t_name VARCHAR(20)
);
INSERT INTO teacher(t_name) VALUES('LS1');
INSERT INTO teacher(t_name) VALUES('LS2');

image_1b4d974o2lm7dfiser8qvj159.png-13.4kB

class表:

1
2
3
4
5
6
7
8
CREATE TABLE class(
c_id INT PRIMARY KEY AUTO_INCREMENT,
c_name VARCHAR(20),
teacher_id INT
);
ALTER TABLE class ADD CONSTRAINT fk_teacher_id FOREIGN KEY (teacher_id) REFERENCES teacher(t_id);
INSERT INTO class(c_name, teacher_id) VALUES('bj_a', 1);
INSERT INTO class(c_name, teacher_id) VALUES('bj_b', 2);

image_1b4d4baab1lar1uf61hfj2so1ge613.png-14kB

其中teacher_id是指向teacher表的外键:

image_1b4d98u561fcn30bon314mp1k6vm.png-23.3kB

student表:

1
2
3
4
5
6
7
8
9
10
11
12
CREATE TABLE student(
s_id INT PRIMARY KEY AUTO_INCREMENT,
s_name VARCHAR(20),
class_id INT
);
ALTER TABLE student ADD CONSTRAINT fk_class_id FOREIGN KEY (class_id) REFERENCES class(c_id);
INSERT INTO student(s_name, class_id) VALUES('xs_A', 1);
INSERT INTO student(s_name, class_id) VALUES('xs_B', 1);
INSERT INTO student(s_name, class_id) VALUES('xs_C', 1);
INSERT INTO student(s_name, class_id) VALUES('xs_D', 2);
INSERT INTO student(s_name, class_id) VALUES('xs_E', 2);
INSERT INTO student(s_name, class_id) VALUES('xs_F', 2);

image_1b4d340jksb31n4511659qhbql9.png-12.2kB

其中class_id是指向class表的外键:

image_1b4d3uqo3hmueec1c961m57e7cm.png-17.6kB

实体类Student,Teacher和Classes:

1
2
3
4
5
6
7
8
9
10
11
12
13
14
15
16
17
18
19
20
21
22
public class Student {
private int id;
private String name;
//getters and setters
@Override
public String toString() {
return "Student [id=" + id + ", name=" + name + "]";
}
public Student(int id, String name) {
super();
this.id = id;
this.name = name;
}
public Student() {
super();
}
}

1
2
3
4
5
6
7
8
9
10
11
12
13
14
15
16
17
18
19
20
21
public class Teacher {
private int id;
private String name;
//getters and setters
@Override
public String toString() {
return "Teacher [id=" + id + ", name=" + name + "]";
}
public Teacher(int id, String name) {
super();
this.id = id;
this.name = name;
}
public Teacher() {
super();
}
}
1
2
3
4
5
6
7
8
9
10
11
12
13
14
15
16
17
18
19
20
21
22
23
24
25
26
27
public class Classes {
private int id;
private String name;
private Teacher teacher;
private List<Student> students;
//getters and setters
@Override
public String toString() {
return "Classes [id=" + id + ", name=" + name + ", teacher=" + teacher + ", students=" + students + "]";
}
public Classes(int id, String name, Teacher teacher, List<Student> students) {
super();
this.id = id;
this.name = name;
this.teacher = teacher;
this.students = students;
}
public Classes() {
super();
}
}

编写映射文件classesMapper.xml(关键)

1
2
3
4
5
6
7
8
9
10
11
12
13
14
15
16
17
18
19
20
21
22
23
24
25
26
27
28
29
30
31
32
33
34
35
36
37
38
39
40
41
42
43
44
45
46
47
48
49
50
51
52
53
54
55
56
57
58
<?xml version="1.0" encoding="UTF-8" ?>
<!DOCTYPE mapper PUBLIC "-//mybatis.org//DTD Mapper 3.0//EN" "http://mybatis.org/dtd/mybatis-3-mapper.dtd">
<mapper namespace="com.mybatis.test6.classesMapper">
<!--
方法一: 嵌套结果: 使用嵌套结果映射来处理重复的联合结果的子集
SELECT * FROM class c, teacher t,student s WHERE c.teacher_id=t.t_id AND c.C_id=s.class_id AND c.c_id=1
-->
<!--
根据classId查询对应的班级信息,包括学生,老师
-->
<select id="getClassesById" parameterType="int" resultMap="classesResultMap">
select * from class c,teacher t,student s where c.teacher_id=t.t_id
and
s.class_id=c.c_id and c.c_id=#{id}
</select>
<resultMap type="Classes" id="classesResultMap">
<id property="id" column="c_id" />
<result property="name" column="c_name" />
<association property="teacher" javaType="Teacher">
<id property="id" column="t_id" />
<result property="name" column="t_name" />
</association>
<!-- ofType指定students集合中的对象类型 -->
<collection property="students" ofType="Student">
<id property="id" column="s_id" />
<result property="name" column="s_name" />
</collection>
</resultMap>
<!--
方法二:嵌套查询:通过执行另外一个SQL映射语句来返回预期的复杂类型
SELECT * FROM class WHERE c_id=1;
SELECT * FROM teacher WHERE t_id=1 //1 是上一个查询得到的teacher_id的值
SELECT * FROM student WHERE class_id=1 //1是第一个查询得到的c_id字段的值
-->
<!--
查询所有的班级信息,包括学生,老师
-->
<select id="getAllClasses" resultMap="allClassesResultMap">
select * from class
</select>
<resultMap type="Classes" id="allClassesResultMap">
<id property="id" column="c_id" />
<result property="name" column="c_name" />
<association property="teacher" column="teacher_id"
select="getTeacherById">
</association>
<collection property="students" column="c_id"
select="getStudentByClassId"></collection>
</resultMap>
<select id="getTeacherById" parameterType="int" resultType="Teacher">
select t_name name from teacher where t_id=#{id}
</select>
<select id="getStudentByClassId" parameterType="int" resultType="Student">
select s_id id,s_name name from student where class_id=#{id}
</select>
</mapper>

这里提供了两种方法处理一对多的关联关系,和一对一中类似,分别是联表查询和分两次查询。关键点在于resultMap节点中的collection节点,注意在联表查询时,需要通过collection节点的ofType属性指定返回的集合的元素类型。

mybatis一对一关联关系

发表于 2016-12-20   |   分类于 mybatis   |  

  这篇文章介绍mybatis如何处理一对一的关联关系,假设现在有班级类(表)和教师类(表),一个教师对应一个班级,一个班级也只对应一个教师。
  
首先创建表并插入数据:

1
2
3
4
5
6
7
8
9
10
11
12
13
14
15
16
CREATE TABLE teacher(
t_id INT PRIMARY KEY AUTO_INCREMENT,
t_name VARCHAR(20)
);
CREATE TABLE class(
c_id INT PRIMARY KEY AUTO_INCREMENT,
c_name VARCHAR(20),
teacher_id INT
);
ALTER TABLE class ADD CONSTRAINT fk_teacher_id FOREIGN KEY (teacher_id) REFERENCES teacher(t_id);
INSERT INTO teacher(t_name) VALUES('LS1');
INSERT INTO teacher(t_name) VALUES('LS2');
INSERT INTO class(c_name, teacher_id) VALUES('bj_a', 1);
INSERT INTO class(c_name, teacher_id) VALUES('bj_b', 2);

image_1b4d0n484ohg1bg8m701pkegv59.png-15.1kB

image_1b4d0ndqt1d001otb3bd1kbo6tfm.png-15.2kB

其中,class表中的teacher_id是指向teacher表的外键:
image_1b4d0sebt4d3e9r1fhjgm7e813.png-17.9kB

创建实体类:

1
2
3
4
5
6
7
8
9
10
11
12
13
14
15
16
17
18
19
public class Teacher {
private int id;
private String name;
@Override
public String toString() {
return "Teacher [id=" + id + ", name=" + name + "]";
}
public Teacher(int id, String name) {
super();
this.id = id;
this.name = name;
}
public Teacher() {
super();
}
}

1
2
3
4
5
6
7
8
9
10
11
12
13
14
15
16
17
18
19
20
21
public class Classes {
private int id;
private String name;
private Teacher teacher;
@Override
public String toString() {
return "Classes [id=" + id + ", name=" + name + ", teacher=" + teacher + "]";
}
public Classes(int id, String name, Teacher teacher) {
super();
this.id = id;
this.name = name;
this.teacher = teacher;
}
public Classes() {
super();
}
}

主要的处理过程在Classes类的映射文件classesMapper.xml中:

1
2
3
4
5
6
7
8
9
10
11
12
13
14
15
16
17
18
19
20
21
22
23
24
25
26
27
28
29
30
31
32
33
34
35
36
37
38
39
40
41
42
43
44
45
46
47
48
49
50
51
52
53
<?xml version="1.0" encoding="UTF-8" ?>
<!DOCTYPE mapper PUBLIC "-//mybatis.org//DTD Mapper 3.0//EN" "http://mybatis.org/dtd/mybatis-3-mapper.dtd">
<mapper namespace="com.mybatis.test5.classesMapper">
<!--
根据班级id查询班级信息(带老师的信息)
##1. 联表查询
SELECT * FROM class c,teacher t WHERE c.teacher_id=t.t_id AND c.c_id=1;
##2. 执行两次查询
SELECT * FROM class WHERE c_id=1; //teacher_id=1
SELECT * FROM teacher WHERE t_id=1;//使用上面得到的teacher_id
-->
<!--
方式一:嵌套结果:使用嵌套结果映射来处理重复的联合结果的子集
封装联表查询的数据(去除重复的数据)
select * from class c, teacher t where c.teacher_id=t.t_id and c.c_id=1
-->
<select id="getClassesById" parameterType="int" resultMap="classesResultMap">
select * from class c,teacher t where c.teacher_id=t.t_id and
c.c_id=#{id}
</select>
<resultMap type="Classes" id="classesResultMap">
<id property="id" column="c_id"/>
<result property="name" column="c_name"/>
<association property="teacher" javaType="Teacher">
<id property="id" column="t_id"/>
<result property="name" column="t_name"/>
</association>
</resultMap>
<!--
方式二:嵌套查询:通过执行另外一个SQL映射语句来返回预期的复杂类型
SELECT * FROM class WHERE c_id=1;
SELECT * FROM teacher WHERE t_id=1 //1 是上一个查询得到的teacher_id的值
-->
<!--
查询所有的班级信息,包括教师信息
-->
<select id="getAllClasses" resultMap="allClassesResultMap">
select * from class
</select>
<resultMap type="Classes" id="allClassesResultMap">
<id property="id" column="c_id"/>
<result property="name" column="c_name"/>
<association property="teacher" column="teacher_id" select="getTeacherById">
</association>
</resultMap>
<select id="getTeacherById" parameterType="int" resultType="Teacher">
select t_name name from teacher where t_id=#{id}
</select>
</mapper>

这里介绍了两种方法,第一种是通过联表查询,获取每条class记录执行一次select语句:

1
SELECT * FROM class c,teacher t WHERE c.teacher_id=t.t_id AND c.c_id=?;

另一种方法是通过两次查询,先查找class,再根据查找到的class的teacher_id查询teacher,即获取每条class记录执行两次select语句:

1
2
SELECT * FROM class WHERE c_id=?;
SELECT * FROM teacher WHERE t_id=?;

其中的一个重点是resultMap节点中的association节点,它将查询到的列值赋给Classes类的Teacher属性类的对应字段。另外,在第二种方法中,association节点的select属性指定了第二次查询的select节点。
association节点的属性如下:

  • property:对象属性的名称
  • javaType:对象属性的类型
  • column:对应的外键字段名称
  • select:使用的另一个查询的id

用mybatis实现简单的CRUD

发表于 2016-12-19   |   分类于 mybatis   |  

  下面介绍如何用mybatis实现简单的增删改查功能,有两种方式,一种是通过xml配置文件实现,一种是通过注解实现。
  
仍然通过对user的操作进行说明,新建好项目并导入jar包后,新建数据库和表,并插入两条记录:

1
2
3
4
5
create database mybatis;
use mybatis;
CREATE TABLE users(id INT PRIMARY KEY AUTO_INCREMENT, NAME VARCHAR(20), age INT);
INSERT INTO users(NAME, age) VALUES('Tom', 12);
INSERT INTO users(NAME, age) VALUES('Jack', 11);

建表成功:
image_1b4bbvojp1ilqqsu1ad9105783f9.png-14kB

新建实体类User.java

1
2
3
4
5
6
7
8
9
10
11
12
13
14
15
package com.mybatis.entities;
public class User {
private Integer id;
private String name;
private Integer age;
//getters and setters
@Override
public String toString() {
return "User [id=" + id + ", name=" + name + ", age=" + age + "]";
}
}

通过XML实现

新建映射文件userMapper.xml:

1
2
3
4
5
6
7
8
9
10
11
12
13
14
15
16
17
18
19
20
21
22
23
24
25
26
27
28
29
30
31
32
33
<?xml version="1.0" encoding="UTF-8" ?>
<!DOCTYPE mapper PUBLIC "-//mybatis.org//DTD Mapper 3.0//EN" "http://mybatis.org/dtd/mybatis-3-mapper.dtd">
<mapper namespace="com.mybatis.test2.userMapper">
<!-- 添加操作 -->
<insert id="addUser" parameterType="com.mybatis.entities.User">
insert into users(name,age)
values(#{name},#{age})
</insert>
<!-- 删除操作 -->
<delete id="deleteUser" parameterType="int">
delete from users where
id=#{id}
</delete>
<!-- 更新操作 -->
<update id="updateUser" parameterType="com.mybatis.entities.User">
update users set name = #{name},age = #{age} where id = #{id}
</update>
<!-- 根据id查找单个记录 -->
<select id="getUserById" parameterType="int"
resultType="com.mybatis.entities.User">
select *
from users where id=#{id}
</select>
<!-- 查找所有记录 -->
<select id="getAllUsers" resultType="com.mybatis.entities.User">
select * from users
</select>
</mapper>

在mybatis配置文件中注册上述映射文件:

1
2
3
<mappers>
<mapper resource="com/mybatis/test2/userMapper.xml" />
</mappers>

编写测试类进行测试:

1
2
3
4
5
6
7
8
9
10
11
12
13
14
15
16
17
18
19
20
21
22
23
24
25
26
27
28
29
30
31
32
33
34
35
36
37
38
39
40
41
42
43
44
45
46
47
48
49
50
51
52
53
54
55
56
public class Test {
private SqlSessionFactory sessionFactory;
private SqlSession session;
@Before
public void init(){
//读取配置文件
String resource = "conf.xml";
InputStream is = this.getClass().getClassLoader().getResourceAsStream(resource);
//创建SqlSessionFactory和SqlSession
sessionFactory = new SqlSessionFactoryBuilder().build(is);
session = sessionFactory.openSession();
}
@After
public void free(){
session.commit();
session.close();
}
@org.junit.Test
public void testAddUser() {
String statement = "com.mybatis.test2.userMapper"+".addUser";
User user = new User(-1, "Alan", 25);
session.insert(statement, user);
}
@org.junit.Test
public void testDeleteUser() {
String statement = "com.mybatis.test2.userMapper"+".deleteUser";
session.delete(statement, 3);
}
@org.junit.Test
public void testUpdateUser() {
String statement = "com.mybatis.test2.userMapper"+".updateUser";
User user = new User(2,"Jim",19);
session.update(statement, user);
}
@org.junit.Test
public void testgetUserById() {
String statement = "com.mybatis.test2.userMapper"+".getUserById";
User user = session.selectOne(statement, 1);
System.out.println(user);
}
@org.junit.Test
public void testgetAllUsers() {
String statement = "com.mybatis.test2.userMapper"+".getAllUsers";
List<User> list = session.selectList(statement);
System.out.println(list);
}
}

注意点:

  1. 在映射文件中,当parameterType=”int”时,sql语句中的参数名可以随便定义,例如#{id},#{_id}都可以;但是当parameterType=”com.mybatis.entities.User”时,sql语句中的参数名需要和User类中的对应字段名一致,例如#{id}对应User类中的字段id,而不能写成#{_id}。
  2. 在映射文件中定义getAllUsers时,只需要指明返回的集合中的元素的类型,即仅需要指明resultType=”com.mybatis.entities.User”就可以了。

通过注解实现

新建接口UserMapper.java:

1
2
3
4
5
6
7
8
9
10
11
12
13
14
15
16
public interface UserMapper {
@Insert("insert into users(name,age) values(#{name},#{age})")
public int addUser(User user);
@Delete("delete from users where id=#{id}")
public int deleteUser(int id);
@Update("update users set name=#{name},age=#{age} where id=#{id}")
public int updateUser(User user);
@Select("select * from users where id=#{id}")
public User getUserById(int id);
@Select("select * from users")
public List<User> getAllUsers();
}

在mybatis配置文件中注册该接口:

1
2
3
<mappers>
<mapper class="com.mybatis.test3.UserMapper"/>
</mappers>

编写测试列进行测试:

1
2
3
4
5
6
7
8
9
10
11
12
13
14
15
16
17
18
19
20
21
22
23
24
25
26
27
28
29
30
31
32
33
34
35
36
37
38
39
40
41
42
43
44
45
46
47
48
49
50
51
52
53
54
55
56
public class Test {
private SqlSessionFactory sessionFactory;
private SqlSession session;
private UserMapper userMapper;
@Before
public void init(){
//读取配置文件
String resource = "conf.xml";
InputStream is = this.getClass().getClassLoader().getResourceAsStream(resource);
//创建SqlSessionFactory和SqlSession
sessionFactory = new SqlSessionFactoryBuilder().build(is);
session = sessionFactory.openSession();
//获取UserMapper
userMapper = session.getMapper(UserMapper.class);
}
@After
public void free(){
session.commit();
session.close();
}
@org.junit.Test
public void testAddUser() {
User user = new User(-1, "Alan", 25);
userMapper.addUser(user);
}
@org.junit.Test
public void testDeleteUser() {
userMapper.deleteUser(9);
}
@org.junit.Test
public void testUpdateUser() {
User user = new User(2,"Jim",19);
userMapper.updateUser(user);
}
@org.junit.Test
public void testgetUserById() {
User user = userMapper.getUserById(1);
System.out.println(user);
}
@org.junit.Test
public void testgetAllUsers() {
List<User> list = userMapper.getAllUsers();
System.out.println(list);
}
}

可以优化的地方

一、连接数据库的配置单独放在一个properties文件中:

新建配置文件db.properties:

1
2
3
4
driver=com.mysql.jdbc.Driver
url=jdbc:mysql://localhost:3306/mybatis
name=你的数据库用户名
password=你的数据库密码

在mybatis配置文件中配置:

1
2
3
4
5
6
7
8
9
10
11
12
13
14
15
16
17
18
19
20
21
22
<?xml version="1.0" encoding="UTF-8"?>
<!DOCTYPE configuration PUBLIC "-//mybatis.org//DTD Config 3.0//EN" "http://mybatis.org/dtd/mybatis-3-config.dtd">
<configuration>
<properties resource="db.properties"/>
<environments default="development">
<environment id="development">
<transactionManager type="JDBC" />
<dataSource type="POOLED">
<property name="driver" value="${driver}" />
<property name="url" value="${url}" />
<property name="username" value="${name}" />
<property name="password" value="${password}" />
</dataSource>
</environment>
</environments>
<mappers>
...
</mappers>
</configuration>

二、 可以为实体类定义别名,以简化映射文件中的引用:

在mybatis配置文件的configuration节点下配置:

1
2
3
<typeAliases>
<typeAlias type="com.mybatis.entities.User" alias="User"/>
</typeAliases>

那么,当要在映射文件引用User类的全类名时,只需要使用”User”即可,例如:

1
2
3
4
5
<!-- 添加操作 -->
<insert id="addUser" parameterType="User">
insert into users(name,age)
values(#{name},#{age})
</insert>

当要定义别名的类比较多时,还有一种更方便的方法,在mybatis配置文件的configuration节点下配置:

1
2
3
<typeAliases>
<package name="com.mybatis.entities"/>
</typeAliases>

这将声明在映射文件中,包com.mybatis.entities下的所有类都可以用简单类名来替代全类名。

三、可以在src下加入log4j的配置文件,打印日志信息:

首先需要先导入log4j的jar包:

image_1b4br2p5dqlm1urr5531d9q1g4o9.png-3.5kB

然后配置log4j,有两种方法:

方法一、在src目录下新建log4j.properties:

1
2
3
4
5
6
7
8
9
10
11
log4j.properties,
log4j.rootLogger=DEBUG, Console
#Console
log4j.appender.Console=org.apache.log4j.ConsoleAppender
log4j.appender.Console.layout=org.apache.log4j.PatternLayout
log4j.appender.Console.layout.ConversionPattern=%d [%t] %-5p [%c] - %m%n
log4j.logger.java.sql.ResultSet=INFO
log4j.logger.org.apache=INFO
log4j.logger.java.sql.Connection=DEBUG
log4j.logger.java.sql.Statement=DEBUG
log4j.logger.java.sql.PreparedStatement=DEBUG

方法二、在src目录下新建log4j.xml:

1
2
3
4
5
6
7
8
9
10
11
12
13
14
15
16
17
18
19
<?xml version="1.0" encoding="UTF-8" ?>
<!DOCTYPE log4j:configuration SYSTEM "log4j.dtd">
<log4j:configuration xmlns:log4j="http://jakarta.apache.org/log4j/">
<appender name="STDOUT" class="org.apache.log4j.ConsoleAppender">
<layout class="org.apache.log4j.PatternLayout">
<param name="ConversionPattern" value="%-5p %d{MM-dd HH:mm:ss,SSS} %m (%F:%L) \n" />
</layout>
</appender>
<logger name="java.sql">
<level value="debug" />
</logger>
<logger name="org.apache.ibatis">
<level value="debug" />
</logger>
<root>
<level value="debug" />
<appender-ref ref="STDOUT" />
</root>
</log4j:configuration>

然后当执行sql操作时就会在控制台打印sql语句。

解决字段名与实体类属性名不相同的冲突

  在上面的例子中,我们在映射文件中按一下方式定义select操作时:

1
2
3
4
5
<select id="getUserById" parameterType="int"
resultType="User">
select *
from users where id=#{id}
</select>

之所以能够查找成功并成功返回一个User对象,是因为实体类User的字段名和表users的列名完全一致:

User类:
image_1b4bsgsuo1skrrcgp711djtr213.png-4.7kB

users表:
image_1b4bsjji91o9t1pd01rp47oi11s71t.png-6.5kB

当它们不一致时,就无法通过这种方式达到预期的效果。这个问题有两种解决办法,为了进行说明,我们先定义列名和字段名不一致的表orders和类Order:
  
新建表,并插入三条记录:

1
2
3
4
5
6
7
8
CREATE TABLE orders(
order_id INT PRIMARY KEY AUTO_INCREMENT,
order_no VARCHAR(20),
order_price FLOAT
);
INSERT INTO orders(order_no, order_price) VALUES('aaaa', 23);
INSERT INTO orders(order_no, order_price) VALUES('bbbb', 33);
INSERT INTO orders(order_no, order_price) VALUES('cccc', 22);

image_1b4bs0168efh1v42ohqlj414fum.png-10.4kB

新建实体类:

1
2
3
4
5
6
7
8
9
10
11
12
13
14
15
16
17
18
19
20
21
22
23
public class Order {
private int id;
private String orderNo;
private float price;
//getters and setters
@Override
public String toString() {
return "Order [id=" + id + ", orderNo=" + orderNo + ", price=" + price + "]";
}
public Order(int id, String orderNo, float price) {
super();
this.id = id;
this.orderNo = orderNo;
this.price = price;
}
public Order() {
super();
}
}

  在这个例子中,orders表的列为order_id,order_no,order_price,Order类的对应字段名分别为id,orderNo,price,解决方法如下:
  
方法一、通过在映射文件的sql语句中定义别名:

1
2
3
<select id="getOrder" parameterType="int" resultType="Order">
select order_no orderNo,order_price price from orders where order_id=#{id}
</select>

方法二: 通过映射文件中节点的resultMap属性:

1
2
3
4
5
6
7
8
9
<select id="getAllOrders" resultMap="orderResultMap">
select * from orders
</select>
<resultMap type="Order" id="orderResultMap">
<id property="id" column="order_id" />
<result property="orderNo" column="order_no" />
<result property="price" column="order_price"/>
</resultMap>

其中,select节点中的resultMap需要和resultMap节点的id对应。在resultMap节点下,主键使用id节点,普通属性使用result节点,其中property指实体类中的字段名,column指数据库表中对应的列名。

mybatis快速入门

发表于 2016-12-19   |   分类于 mybatis   |  

Mybatis简介

  MyBatis是支持普通SQL查询,存储过程和高级映射的优秀持久层框架。MyBatis消除了几乎所有的JDBC代码和参数的手工设置以及对结果集的检索封装。MyBatis可以使用简单的XML或注解用于配置和原始映射,将接口和Java的POJO(Plain Old Java Objects,普通的Java对象)映射成数据库中的记录。   

Mybatis快速入门

下面写一个简单的测试例子,首先新建一个project,导入mybatis核心jar包和mysql驱动jar包:
image_1b4adm56plbu1d1bgvv8p21fdu9.png-4.6kB

新建数据库和表,并插入两条记录:

1
2
3
4
5
create database mybatis;
use mybatis;
CREATE TABLE users(id INT PRIMARY KEY AUTO_INCREMENT, NAME VARCHAR(20), age INT);
INSERT INTO users(NAME, age) VALUES('Tom', 12);
INSERT INTO users(NAME, age) VALUES('Jack', 11);

建表成功:
image_1b4aeseal1l64lvmiht1b391ns913.png-14kB

新建实体类User.java

1
2
3
4
5
6
7
8
9
10
11
12
13
14
15
package com.mybatis.entities;
public class User {
private Integer id;
private String name;
private Integer age;
//getters and setters
@Override
public String toString() {
return "User [id=" + id + ", name=" + name + ", age=" + age + "]";
}
}

新建实体类的映射文件userMapper.xml

1
2
3
4
5
6
7
8
9
10
11
<?xml version="1.0" encoding="UTF-8" ?>
<!DOCTYPE mapper PUBLIC "-//mybatis.org//DTD Mapper 3.0//EN" "http://mybatis.org/dtd/mybatis-3-mapper.dtd">
<mapper namespace="com.mybatis.entities.userMapper">
<!-- 定义一个查询,根据id查询到一条users记录 -->
<!-- parameterType指定sql语句的#{id}中id类型为int -->
<!-- resultType指定将查询结果封装到一个User类中进行返回 -->
<select id="getUser" parameterType="int"
resultType="com.mybatis.entities.User">
select * from users where id=#{id}
</select>
</mapper>

在src目录下新建mybatis配置文件conf.xml:

1
2
3
4
5
6
7
8
9
10
11
12
13
14
15
16
17
18
19
20
21
22
23
24
25
26
27
<?xml version="1.0" encoding="UTF-8"?>
<!DOCTYPE configuration PUBLIC "-//mybatis.org//DTD Config 3.0//EN" "http://mybatis.org/dtd/mybatis-3-config.dtd">
<configuration>
  
  <!-- 可选development:开发模式,work:工作模式 -->
<environments default="development">
<environment id="development">
  <!-- 事务管理,使用JDBC的提交和回滚设置 -->
<transactionManager type="JDBC" />
<!-- 配置数据源,使用连接池 -->
<dataSource type="POOLED">
<property name="driver" value="com.mysql.jdbc.Driver" />
<property name="url" value="jdbc:mysql://localhost:3306/mybatis" />
<property name="username" value="你的数据库用户名" />
<property name="password" value="你的数据库密码" />
</dataSource>
</environment>
</environments>
<!-- 注册映射文件 -->
<mappers>
<mapper resource="com/mybatis/entities/userMapper.xml"/>
</mappers>
</configuration>

测试:

1
2
3
4
5
6
7
8
9
10
11
12
13
14
15
16
17
18
19
20
21
public class Test {
@org.junit.Test
public void test() {
//读取配置文件
String resource = "conf.xml";
InputStream is = this.getClass().getClassLoader().getResourceAsStream(resource);
//创建SqlSessionFactory和SqlSession
SqlSessionFactory sessionFactory = new SqlSessionFactoryBuilder().build(is);
SqlSession session = sessionFactory.openSession();
//映射sql的标识字符串
//com.mybatis.entities.userMapper对应映射文件中的namespace
//getUser对应映射文件中的select标签的id
String statement = "com.mybatis.entities.userMapper"+".getUser";
//执行查询返回id为1的记录
User user = session.selectOne(statement, 1);
System.out.println(user);
}
}

运行结果如下图所示:
image_1b4agku565uour7v9ub851m4q1g.png-5.2kB

Linux基本命令

发表于 2016-12-18   |  

Hibernate管理Session和批量操作

发表于 2016-12-08   |  

管理Session

  Hibernate自身提供了三种管理Session对象的方法:
  ① Session对象的生命周期与本地线程绑定
  ② Session对象的生命周期与JTA事务绑定
  ③ Hibernate委托程序管理Session对象的生命周期
  
  在Hibernate的配置文件中,hibernate.current_session_context_class属性用于指定Session管理方式,可选值包括:
  thread: Session对象的生命周期与本地线程绑定
  jta*: Session对象的生命周期与JTA事务绑定
  managed: Hibernate委托程序来管理Session对象的生命周期
  
  现在介绍第一种管理方式,即将Session对象的生命周期与本地线程绑定。
  如果把Hibernate配置文件的hibernate.current_session_context_class属性设置为thread,Hibernate就会按照与本地线程绑定的方式来管理Session。
  
  Hibernate按以下规则把Session与本地线程绑定:
  当一个线程(threadA)第一次调用SessionFactory的getCurrentSession()方法时,该方法会创建一个新的Session(sessionA)对象,把该对象与threadA绑定,并将sessionA返回。
  当threadA再次调用SessionFactory对象的getCurrentSession()方法时,该方法将返回sessionA对象。
  当threadA提交sessionA对象关联的事务时,Hibernate会自动flush sessionA对象的缓存,然后提交事务,关闭sessionA对象。当threadA撤销sessionA关联的事务时,也会自动关闭sessionA对象。
  若threadA再次调用SessionFactory对象的getCurrentSession()方法时,该方法会创建一个新的Session(sessionB)对象,把该对象与threadA绑定,并将sessionB返回。   

批量处理

  批量处理数据是指在一个事务中处理大量数据。
  在应用层进行批量操作,主要有以下方式:
  1.通过Session
  2.通过HQL
  3.通过StatelessSession
  4.通过JDBC API(推荐方式,效率最高)
  
通过Session进行批量操作:
  Session的save()及update()方法都会把处理的对象存放在自己的缓存中。如果通过一个Session对象来处理大量持久化对象,应该及时从缓存中清空已经处理完毕并且不会再访问的对象。具体的做法是在处理完一个对象或小批量对象后,立即调用flush()方法刷新缓存,然后再调用clear()方法情况缓存。
  通过Session来进行处理操作会受到以下约束:
  1.需要在Hibernate配置文件中设置JDBC单次批量处理的数目,应保证每次向数据库发送的批量的SQL语句数目与batch size属性一致。
  2.若对象采用”identity”标识生成器,则Hibernate无法在JDBC曾进行批量插入操作
  3.进行批量操作时,建议关闭Hibernate的二级缓存

下面的代码演示了通过session批量插入数据:

1
2
3
4
5
6
7
8
9
10
11
News news = null;
for(int i = 0; i < 10000; i++) {
news = new News();
news.setTitle("--" + i);
session.save(news);
if((i + 1) % 20 == 0) {
session.flush();
session.clear();
}
}

  对于批量更新,在进行批量更新时,如果一下子把所有对象都加载到Session缓存,然后在缓存中一一更新,显然是不可取的。
  使用可滚动的结果集org.hibernate.ScrollableResults,该对象中实际上并不包含任何对象,只包含用于在线定位记录的游标。只有当程序遍历访问ScrollableResults对象的特定元素时,它才会到数据库中加载相应的对象。
  org.hibernate.ScrollableResults对象由Query的scroll方法返回。
  代码如下:

1
2
3
4
5
6
7
8
9
10
11
12
ScrollableResults sr = session.createQuery("FROM News").scroll();
int count = 0;
while (sr.next()) {
News n = (News) sr.get(0);
n.setTitle(n.getTitle() + "*****");
if (((count++) + 1) % 100 == 0) {
session.flush();
session.clear();
}
}

通过HQL进行批量操作:

注意:HQL只支持INSERT INTO … SELECT形式的插入语句,但不支持INSERT INTO … VALUES形式的插入语句,所以使用HQL不能进行批量插入操作。

通过StatelessSession进行批量操作:

从形式上看,StatelessSession与Session的用法类似。StatelessSession与Session相比,有以下区别:
  StatelessSession没有缓存,通过StatelessSession来加载、保存或更新后的对象处于游离状态.
  StatelessSession不会与Hibernate的二级缓存交互。
  当调用StatelessSession的save()、update()或delete()方法时,这些方法会立即执行相应的SQL语句,而不会仅计划执行一条SQL语句。
  StatelessSession不会进行脏检查,因此修改了Customer对象属性后,还需要调用StatelessSession的update()方法来更新数据库中数据。
  StatelessSession不会对关联的对象进行任何的级联操作。
  通过同一个StatelessSession对象两次加载的OID为1的Customer对象,得到的两个对象内存地址不同。
  StatelessSession所做的操作可以被Interceptor拦截器捕获到,但是会被Hibernate的事件处理系统忽略掉。
  
通过JDBC API执行批量操作:(推荐)
  这是效率最高的方法,代码如下:

1
2
3
4
5
6
7
8
public void testBatch() {
session.doWork(new Work() {
@Override
public void execute(Connection connection) throws SQLException {
// 通过 JDBC 原生的 API 进行操作, 效率最高, 速度最快!
}
});
}

Hibernate二级缓存——SessionFactory

发表于 2016-12-08   |   分类于 Hibernate   |  

Hibernate二级缓存简介

  在《Hibernate一级缓存——Session》中介绍了Session级别的一级缓存,例如,当如下的代码执行时,由于一级缓存的作用,只会发送一条select语句:

1
2
3
4
5
6
7
8
9
@Test
public void testCache(){
Employee employee1 = (Employee) session.get(Employee.class, 1);
System.out.println(employee1);
Employee employee2 = (Employee) session.get(Employee.class, 1);
System.out.println(employee2);
}

image_1b3e0uaih1m5o1oqu1q3g18r1ksc13.png-19kB

  现在,我们在两次加载代码之间,先关闭当前的session和事务,再重新开启一个session和事务,那么不难理解,由于开启了新的session,所以会打印两条select语句:

1
2
3
4
5
6
7
8
9
10
11
12
13
14
15
16
17
@Test
public void testCache(){
Employee employee1 = (Employee) session.get(Employee.class, 1);
System.out.println(employee1);
//提交事务,关session
transaction.commit();
session.close();
//开启一个新的session和事务
session = sessionFactory.openSession();
transaction = session.beginTransaction();
Employee employee2 = (Employee) session.get(Employee.class, 1);
System.out.println(employee2);
}

image_1b3e116cat3g1gk1fv4brlje1g.png-34.8kB
  那么,有没有办法使就算session关闭,也能缓存employee对象的办法呢?这就是我们现在要介绍的,SessionFactory级别的,Hibernate二级缓存。
  
  缓存(Cache )是计算机领域非常通用的概念。它介于应用程序和永久性数据存储源(如硬盘上的文件或者数据库)之间,其作用是降低应用程序直接读写永久性数据存储源的频率,从而提高应用的运行性能。缓存中的数据是数据存储源中数据的拷贝,应用程序在运行时直接读写缓存中的数据,只在某些特定时刻按照缓存中的数据来同步更新数据存储源。缓存的物理介质通常是内存。
  
  Hibernate中提供了两个级别的缓存:
  1.第一级别的缓存是Session级别的缓存,它是属于事务范围的缓存,即缓存只能被当前事务访问,每个事务都有独自的缓存。缓存的生命周期依赖于事务的生命周期,当事务结束时,缓存也就结束生命周期。在此范围下,缓存的介质是内存。这一级别的缓存是由hibernate管理的,一般情况下无须进行干预。
  2.第二级别的缓存是SessionFactory级别的缓存,它是属于进程范围的缓存。缓存被进程内的所有事务共享。这些事务有可能是并发访问缓存,因此必须对缓存采取必要的事务隔离机制。缓存的生命周期依赖于进程的生命周期,进程结束时,缓存也就结束了生命周期。进程范围的缓存可能会存放大量的数据,所以存放的介质可以是内存或硬盘。这一级别的缓存可以进行配置和更改,并且可以动态加载和卸载。
  
  SessionFactory 的缓存可以分为两类:
  内置缓存: Hibernate自带的,不可卸载。通常在Hibernate的初始化阶段,Hibernate会把映射元数据和预定义的SQL语句放到SessionFactory的缓存中,映射元数据是映射文件中数据的复制,而预定义SQL语句是Hibernate根据映射元数据推到出来的。该内置缓存是只读的。
  外置缓存(二级缓存):一个可配置的缓存插件。在默认情况下,SessionFactory不会启用这个缓存插件。外置缓存中的数据是数据库中数据的复制,外置缓存的物理介质可以是内存,也可以是硬盘。
  
  缓存的物理介质通常是内存,而永久性数据存储源的物理介质通常是硬盘或磁盘,应用程序读写内在的速度显然比读写硬盘的速度快,如果缓存中存放的数据量非常大,也会用硬盘作为缓存的物理介质。缓存的实现不仅需要作为物理介质的硬件,同时还需要用于管理缓存的并发访问和过期等策略的软件。因此,缓存是通过软件和硬件共同实现的。
  
  适合放入二级缓存中的数据:
  1.很少被修改;
  2.不是很重要的数据,允许出现偶尔的并发问题。
  
  不适合放入二级缓存中的数据:
  1.经常被修改;
  2.财务数据,绝对不允许出现并发问题;
  3.与其他应用程序共享的数据。
  
  二级缓存的并发访问策略:
  两个并发的事务同时访问持久层的缓存的相同数据时,也有可能出现各类并发问题。
  二级缓存可以设定以下4种类型的并发访问策略,每一种访问策略对应一种事务隔离级别。
  非严格读写(Nonstrict-read-write):不保证缓存与数据库种数据的一致性。提供read uncommitted事务隔离级别。对于极少被修改,而且允许脏读的数据,可以采用这种策略。
  读写型(Read-write):提供read committed事务隔离级别。对于经常读但是很少被修改的数据,可以采用这种隔离类型,它可以防止脏读。(通常选用的策略)
  事务型(Transactional):仅在受管理环境下适用。它提供了repeatable read的事务隔离级别。对于经常读,但是很少被修改的数据,可以采用这种隔离类型,它可以防止脏读和不可重复读。
  只读型(Read-Only):提供serializable事务隔离级别,对于从来不会修改的数据,可以采用这种访问策略,可以避免脏读,不可重复读和幻读。
  
  管理Hibernate的二级缓存:
  Hibernate的二级缓存是进程或者集群范围内的缓存。
  二级缓存是可配置的插件,Hibernate允许选用以下类型的缓存插件:
  EhCache:可作为进程范围的缓存,存放数据的物理介质可以是内存或硬盘,对Hibernate的查询缓存提供了支持。
  OSCache:可作为进程范围的缓存,存放数据的物理介质可以是内存或硬盘,提供了丰富的缓存数据过期策略,对Hibernate的查询缓存提供了支持。
  SwarmCache:可作为群集范围内的缓存,但不支持Hibernate的查询缓存。   JBossCache:可作为群集范围内的缓存,支持事务型并发访问策略,对Hibernate的查询缓存提供了支持。
  
image_1b3dvptab23t1vc1v1g26c1cei9.png-49.7kB

使用Hibernate二级缓存的步骤

  
一、加入二级缓存的jar包及配置文件
  
1.加入jar包
  image_1b3dvuhed16r4ci0ghv1aj3f4m.png-5.1kB
  
2.添加配置文件ehcache.xml到src目录下

1
2
3
4
5
6
7
8
9
10
11
12
13
14
15
16
17
18
19
20
21
22
23
24
25
26
27
28
29
30
31
32
33
34
35
36
37
38
39
40
41
42
43
44
45
46
47
48
49
50
51
52
53
54
55
56
57
58
59
60
61
62
63
64
65
66
67
68
69
70
71
72
73
74
75
76
77
78
79
80
81
82
83
84
85
86
87
88
<ehcache>
<!-- Sets the path to the directory where cache .data files are created.
If the path is a Java System Property it is replaced by
its value in the running VM.
The following properties are translated:
user.home - User's home directory
user.dir - User's current working directory
java.io.tmpdir - Default temp file path -->
<diskStore path="java.io.tmpdir"/>
<!--Default Cache configuration. These will applied to caches programmatically created through
the CacheManager.
The following attributes are required for defaultCache:
maxInMemory - Sets the maximum number of objects that will be created in memory
eternal - Sets whether elements are eternal. If eternal, timeouts are ignored and the element
is never expired.
timeToIdleSeconds - Sets the time to idle for an element before it expires. Is only used
if the element is not eternal. Idle time is now - last accessed time
timeToLiveSeconds - Sets the time to live for an element before it expires. Is only used
if the element is not eternal. TTL is now - creation time
overflowToDisk - Sets whether elements can overflow to disk when the in-memory cache
has reached the maxInMemory limit.
-->
<defaultCache
maxElementsInMemory="10000"
eternal="false"
timeToIdleSeconds="120"
timeToLiveSeconds="120"
overflowToDisk="true"
/>
<!--Predefined caches. Add your cache configuration settings here.
If you do not have a configuration for your cache a WARNING will be issued when the
CacheManager starts
The following attributes are required for defaultCache:
name - Sets the name of the cache. This is used to identify the cache. It must be unique.
maxInMemory - Sets the maximum number of objects that will be created in memory
eternal - Sets whether elements are eternal. If eternal, timeouts are ignored and the element
is never expired.
timeToIdleSeconds - Sets the time to idle for an element before it expires. Is only used
if the element is not eternal. Idle time is now - last accessed time
timeToLiveSeconds - Sets the time to live for an element before it expires. Is only used
if the element is not eternal. TTL is now - creation time
overflowToDisk - Sets whether elements can overflow to disk when the in-memory cache
has reached the maxInMemory limit.
-->
<!-- Sample cache named sampleCache1
This cache contains a maximum in memory of 10000 elements, and will expire
an element if it is idle for more than 5 minutes and lives for more than
10 minutes.
If there are more than 10000 elements it will overflow to the
disk cache, which in this configuration will go to wherever java.io.tmp is
defined on your system. On a standard Linux system this will be /tmp"
-->
<cache name="sampleCache1"
maxElementsInMemory="10000"
eternal="false"
timeToIdleSeconds="300"
timeToLiveSeconds="600"
overflowToDisk="true"
/>
<!-- Sample cache named sampleCache2
This cache contains 1000 elements. Elements will always be held in memory.
They are not expired. -->
<cache name="sampleCache2"
maxElementsInMemory="1000"
eternal="true"
timeToIdleSeconds="0"
timeToLiveSeconds="0"
overflowToDisk="false"
/> -->
<!-- Place configuration for your caches following -->
</ehcache>

二、配置hibernate.cfg.xml
 
1.配置启用hibernate的二级缓存

1
<property name="cache.use_second_level_cache">true</property>

2.配置hibernate二级缓存使用的产品

1
<property name="hibernate.cache.region.factory_class">org.hibernate.cache.ehcache.EhCacheRegionFactory</property>

3.配置对哪些类(或属性)使用 hibernate 的二级缓存

第一种情况,类级别的二级缓存:(配置对Employee类使用二级缓存)

1
<class-cache usage="read-write" class="com.atguigu.hibernate.entities.Employee"/>

第二种情况,集合级别的二级缓存:(配置对Department类中的Employee集合属性emps使用二级缓存)

1
<collection-cache usage="read-write" collection="com.atguigu.hibernate.entities.Department.emps"/>

注意,当配置对集合属性使用二级缓存时,还需要对集合所属的类,集合中元素的类型使用二级缓存,例如,对于上述集合属性,则还需配置对Department类和Employee类使用二级缓存:(如果不对Employee类配置二级缓存,则会多出n条SQL语句,得不偿失。因为这种情况下缓存的是一个一个的employee的id,当要使用到employee对象时,需要再根据id一条一条地去数据库查询记录)

1
2
<class-cache usage="read-write" class="com.atguigu.hibernate.entities.Department"/>
<class-cache usage="read-write" class="com.atguigu.hibernate.entities.Employee"/>

另外,配置对哪些类(或属性)使用二级缓存,还可以在映射文件中配置,例如:
类级别(在class节点下):

1
<cache usage="read-write"/>

集合级别:(在department映射文件的set节点下)

1
<cache usage="read-write"/>

  现在,测试上面的testCache方法,只会打印一条select语句:
  image_1b3e2cv2vad01ntl1rt71oac7o41t.png-18kB
  对于集合的测试也是一样,只会打印两条select语句,一条用于查询department,一条用于查询employee:

1
2
3
4
5
6
7
8
9
10
11
12
13
14
15
16
@Test
public void testCollectionSecondLevelCache(){
Department dept = (Department) session.get(Department.class, 1);
System.out.println(dept.getName());
System.out.println(dept.getEmps().size());
transaction.commit();
session.close();
session = sessionFactory.openSession();
transaction = session.beginTransaction();
Department dept2 = (Department) session.get(Department.class, 1);
System.out.println(dept2.getName());
System.out.println(dept2.getEmps().size());
}

image_1b3e2epr8r731smq4t0scfca62a.png-30.6kB

二级缓存配置文件

  下面使用一个修改过的二级缓存配置文件介绍其中各个属性的作用:

1
2
3
4
5
6
7
8
9
10
11
12
13
14
15
16
17
18
19
20
21
22
23
24
25
26
27
28
29
30
31
32
33
34
35
36
37
38
39
40
41
42
43
44
45
46
47
48
49
50
51
52
53
54
55
56
57
58
59
60
61
62
63
64
65
66
67
68
69
70
71
72
73
74
75
76
77
78
79
80
81
82
<ehcache>
<!-- Sets the path to the directory where cache .data files are created.
If the path is a Java System Property it is replaced by
its value in the running VM.
The following properties are translated:
user.home - User's home directory
user.dir - User's current working directory
java.io.tmpdir - Default temp file path -->
<!--
指定一个目录:当 EHCache 把数据写到硬盘上时, 将把数据写到这个目录下.
-->
<diskStore path="d:\\tempDirectory"/>
<!--Default Cache configuration. These will applied to caches programmatically created through
the CacheManager.
The following attributes are required for defaultCache:
maxInMemory - Sets the maximum number of objects that will be created in memory
eternal - Sets whether elements are eternal. If eternal, timeouts are ignored and the element
is never expired.
timeToIdleSeconds - Sets the time to idle for an element before it expires. Is only used
if the element is not eternal. Idle time is now - last accessed time
timeToLiveSeconds - Sets the time to live for an element before it expires. Is only used
if the element is not eternal. TTL is now - creation time
overflowToDisk - Sets whether elements can overflow to disk when the in-memory cache
has reached the maxInMemory limit.
-->
<!--
设置缓存的默认数据过期策略
-->
<defaultCache
maxElementsInMemory="10000"
eternal="false"
timeToIdleSeconds="120"
timeToLiveSeconds="120"
overflowToDisk="true"
/>
<!--
设定具体的命名缓存的数据过期策略。每个命名缓存代表一个缓存区域
缓存区域(region):一个具有名称的缓存块,可以给每一个缓存块设置不同的缓存策略。
如果没有设置任何的缓存区域,则所有被缓存的对象,都将使用默认的缓存策略。即:<defaultCache.../>
Hibernate 在不同的缓存区域保存不同的类/集合。
对于类而言,区域的名称是类名。如:com.atguigu.domain.Customer
对于集合而言,区域的名称是类名加属性名。如com.atguigu.domain.Customer.orders
-->
<!--
name: 设置缓存的名字,它的取值为类的全限定名或类的集合的名字
maxElementsInMemory: 设置基于内存的缓存中可存放的对象最大数目
eternal: 设置对象是否为永久的, true表示永不过期,
此时将忽略timeToIdleSeconds 和 timeToLiveSeconds属性; 默认值是false
timeToIdleSeconds:设置对象空闲最长时间,以秒为单位, 超过这个时间,对象过期。
当对象过期时,EHCache会把它从缓存中清除。如果此值为0,表示对象可以无限期地处于空闲状态。
timeToLiveSeconds:设置对象生存最长时间,超过这个时间,对象过期。
如果此值为0,表示对象可以无限期地存在于缓存中. 该属性值必须大于或等于 timeToIdleSeconds 属性值
overflowToDisk:设置基于内存的缓存中的对象数目达到上限后,是否把溢出的对象写到基于硬盘的缓存中
-->
<cache name="com.atguigu.hibernate.entities.Employee"
maxElementsInMemory="1"
eternal="false"
timeToIdleSeconds="300"
timeToLiveSeconds="600"
overflowToDisk="true"
/>
<cache name="com.atguigu.hibernate.entities.Department.emps"
maxElementsInMemory="1000"
eternal="true"
timeToIdleSeconds="0"
timeToLiveSeconds="0"
overflowToDisk="false"
/>
</ehcache>

查询缓存

  对于经常使用的查询语句,如果启用了查询缓存,当第一次执行查询语句时,Hibernate会把查询结果存放在查询缓存中,以后再次执行该查询语句时,只需从缓存中获得查询结果,从而提高查询性能。
  默认情况下,Hibernate设置的缓存对HQL和QBC查询是无效的,但可以通过以下步骤使其有效:
  1.配置二级缓存,因为查询缓存依赖于二级缓存.
  2.在hibernate配置文件中声明开启查询缓存。

1
<property name="cache.use_query_cache">true</property>

  3.调用Query或者Criteria的setCachable(true)。
  
例如,在没有配置查询缓存的情况下,下面的代码会打印两条select语句:

1
2
3
4
5
6
7
8
9
10
11
@Test
public void testQueryCache(){
Query query = session.createQuery("FROM Employee");
List<Employee> emps = query.list();
System.out.println(emps.size());
emps = query.list();
System.out.println(emps.size());
}

image_1b3e39bve1vg91r2t12i65c91n782n.png-30.6kB
  
  进行了相关配置之后,并且在方法中设置query.setCacheable(true);则只会打印一条select语句:

1
2
3
4
5
6
7
8
9
10
11
12
@Test
public void testQueryCache(){
Query query = session.createQuery("FROM Employee");
query.setCacheable(true);
List<Employee> emps = query.list();
System.out.println(emps.size());
emps = query.list();
System.out.println(emps.size());
}

image_1b3e3bndj184be4f1mga1gi81baq34.png-18.5kB

  查询缓存适用于如下场合:
  1.应用程序运行时经常使用查询语句
  2.很少对与查询语句检索到的数据进行插入,删除或更新操作

时间戳缓存区域

  时间戳缓存区域存放了对于查询结果相关的表进行插入,更新或者删除操作的时间戳。Hibernate通过时间戳缓存区域来判断被缓存的查询结果是否过期,其运行过程如下:
  T1时刻执行查询操作,把结果存放在QueryCache区域,记录该区域的时间戳为T1;
  T2时刻(可能在T1之前,也可能在T1之后)对查询结果相关的表进行更新操作,Hibernate把T2时刻存放在UpdateTimestampCache区域。
  T3时刻(在T1,T2之后)执行查询结果前,先比较QueryCache区域的时间戳和UpdateTimestampCache区域的时间戳。若T2>T1,则丢弃原先存放在QueryCache区域的查询结果,重新到数据库中查询数据并放入QueryCache区域;若T2

1
2
3
4
5
6
7
8
9
10
11
12
13
14
@Test
public void testUpdateTimeStampCache(){
Query query = session.createQuery("FROM Employee");
query.setCacheable(true);
List<Employee> emps = query.list();
System.out.println(emps.size());
Employee employee = (Employee) session.get(Employee.class, 1);
employee.setSalary(30000);
emps = query.list();
System.out.println(emps.size());
}

  在第二次查询的时候,会重新用select去数据库中查找最新的记录。
  image_1b3e56hbmjqu3n719ono39k8m3h.png-40.9kB

Query接口的iterate()方法

  Query的list方法返回实体类对应表的所有字段,而Query的iterate方法仅返回数据包的ID字段。当使用了iterate方法,然后遍历访问结果集时,先到Session缓存及二级缓存中查看是否存在特定OID的对象,如果存在,直接返回,否则就通过相应的SQL SELECT语句到数据库中查找特定的记录。
  在大多数情况下,应该考虑使用list方法执行查询操作,iterate方法仅在下述情况下可以稍微提高查询性能:
  1.要查询的数据表中包含大量字段;
  2.启用了二级缓存,且二级缓存中可能已经包含了待查询的对象。

12…7
Alan

Alan

Better late than never.

61 日志
11 分类
74 标签
GitHub weibo
© 2016 Alan
由 Hexo 强力驱动
主题 - NexT.Pisces